
Mastering is the final step in music production. It’s the process of improving the sound quality and perceived volume of your song (if possible and/or needed) with the aid of such tools as an equalizer, compressor, limiter, stereo enhancer, etc.
It’s also preparing a song for the proper medium (i.e. “mastered for iTunes”). After mastering, your song should be ready to go public.
Here’s an example song that’s been mastered with the FL Studio mixer state file from this tutorial (download link below). It’s one of my own songs. This is an example of something that you could easily do with the same setup.
First, the unmastered version:

Cut the unnecessary silence at the end or beginning of the song (if any). Check the pic below:

This is to avoid the song being abruptly cut. In some cases, there might be a tail of reverb or delay still playing after the actual song has ended. Check below:

**SIDE NOTE** The following step you should take with caution.
Peak normalizing increases the amplitude of the waveform so that the loudest peak is at its maximum possible level (near 0dB). This increases the track volume without clipping.
Other producers say that you should NOT normalize your WAV at this point. However, I’ve been doing it regardless. I like the signal to be “hot” before feeding it to plugins that affect the dynamics of the audio. I may be doing it wrong, but so far I haven’t had any issues with this step.
But then again, what do I know? I’m just a hobbyist. So be cautious!
After normalization, save the changes to a WAV file.


Remember, even though I’m showcasing a “mastering plugin chain”, the set of plugins you pick really depends on your mix and what kind of treatment you think it needs. The following plugin chain may very well not suit for your needs (you could do just as fine only with an EQ and limiter).
Open the Mixer and add these plugins in a following order to the Master mixer tracks FX slots:
Now, few words about the order of the plugins in the FX chain: notice that the eq used for cutting comes before the compression and eq for boosting, after the compression. Why? Because the eq settings affects how the compression behaves. For example, if you boost some low fequencies before the compression, you raise their peak level and compressor will react to these peaks by trying to attenuate them.
However, like always in audio production, there shouldn’t be too much do’s and dont’s: in some situations the aforementioned can be exactly what you need, but in a normal mastering situation, cutting frequencies might be best to be done before and boosting after the compression..
Below is a pic of the mastering fx chain:
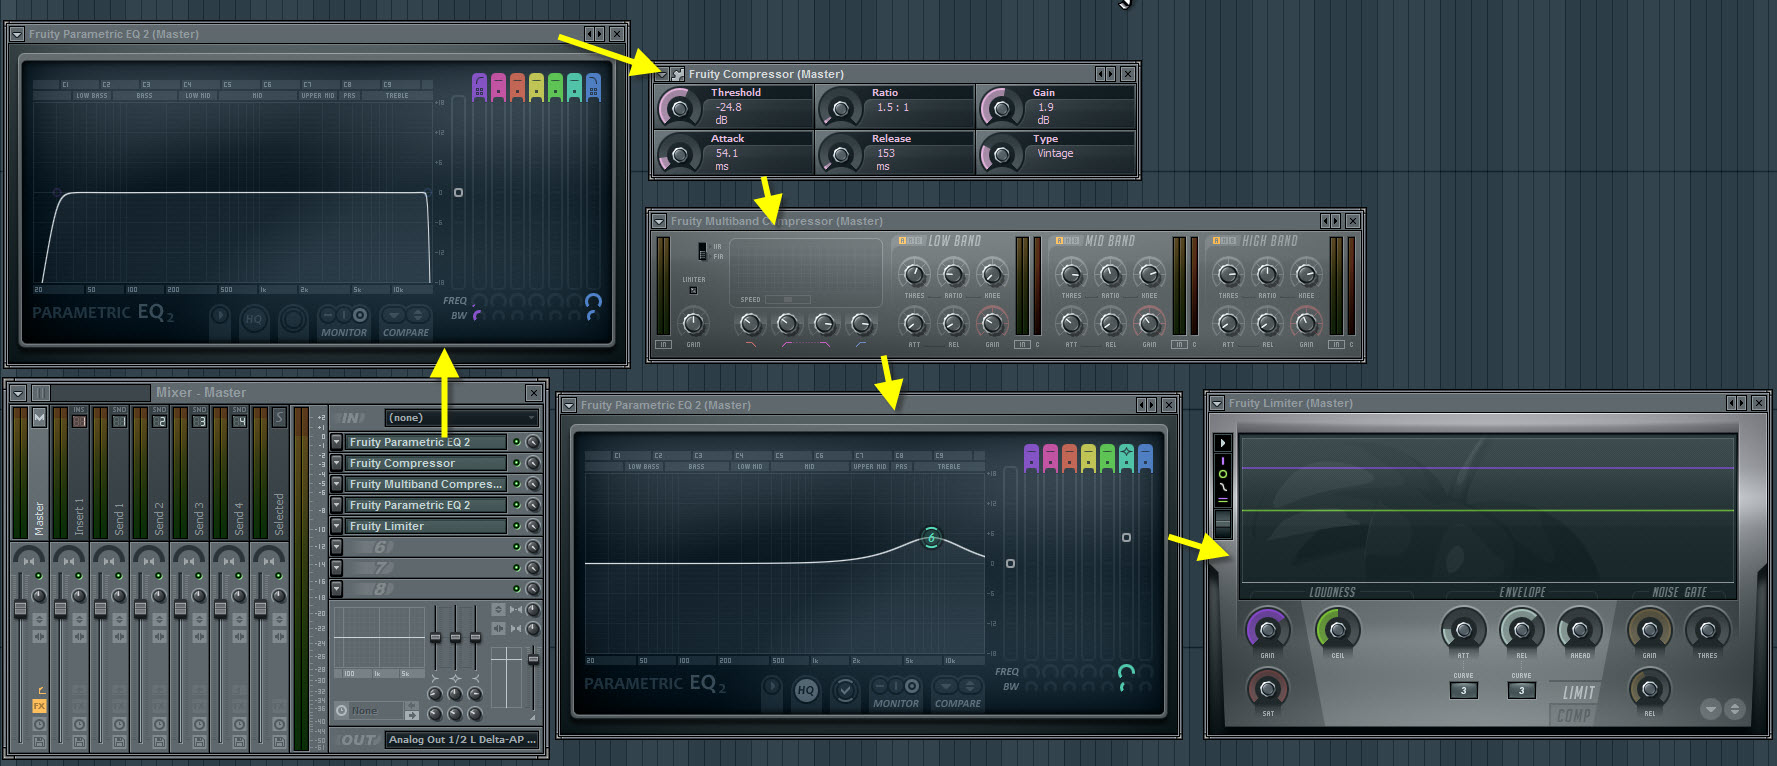
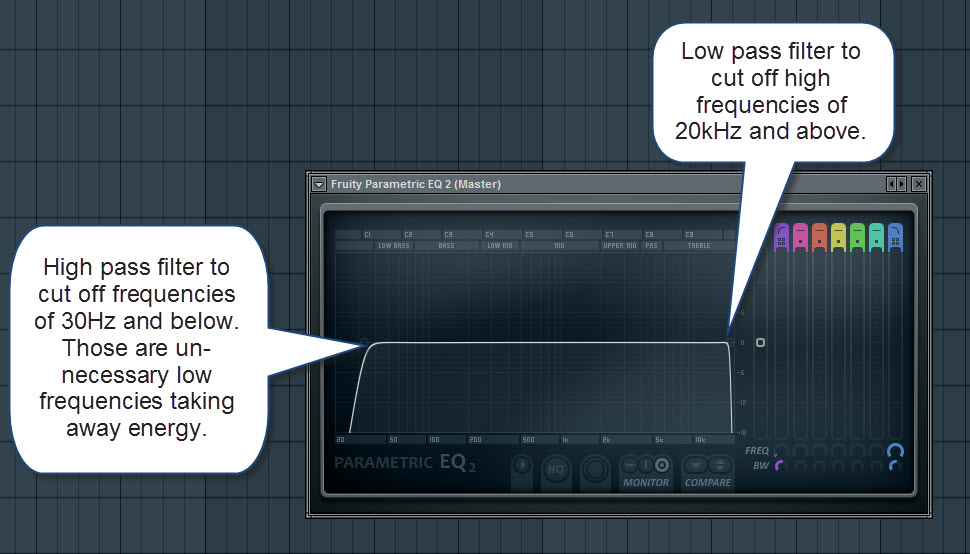
Now, to the settings of the first eq.
This is the eq unit that comes BEFORE the compressors. You may wan’t to cut the very low frequencies from around 20-30Hz using high pass filter with steep filter slope and the high frequencies near 20kHz with low pass filter. Those are frequencies that can’t be heard through most of the normal speaker systems, but they might add unnecessary energy to your mix and may make it sound louder (not in a good way) than it really is. In case like this, it’s like leftover noise that needs to be cleaned.
However, if you’re making electronic music especially for clubs, you might wan’t to consider whether you cut the lows at all. This is because if the song is played through large PA systems, you might loose too much of the low end response. And even though human ear can’t hear frequencies of 20Hz and below, they still can’t be FELT in the club.
On the other hand, and correct me if I’m wrong, not nearly all of the large PA systems are able to go down to 20Hz. I’ve heard that most will actually roll off the 30-40Hz (?), so if your mix has a lot of energy in the 20-30Hz region, it will just uselessly waste the headroom of your mix. With that in mind, setting the cut to 30Hz might be something worth to test.
Also, remember this: if the PA system has been setup poorly, there’s always a risk that sub-bass heavy tracks may blow up the system. 🙂
Cutting the 30Hz range, when it’s not needed, removes the unnecessary frequencies and may clear up your mix nicely and gives a bit more headroom to raise the overall level of your whole mix.
But it’s really up to you and what you’re planning to do with your song. You may actually end up to not use the cutting eq at all.
Note about the high frequency cut: if you feel like it, you may also try to start rolling off the high frequencies already from 16kHz to reduce the occurance of ear aching high end on large PA systems.
Now, to the compression.
Fruity Compressor is a single band compressor and single band compressor is useful in mastering fx chain for leveling the dynamic-range variations in your mix. Compressor is great for “gluing” different sounds in the mix together to tighten up the mix. Fruity Limiter works as good (probably even better as you can SEE where the input signal is peaking so you can easily set a right threshold value) when you activate the compressor mode in it.
Let me explain the idea of compressor a bit more:
Basically, compressor is nothing more than a automated volume controller. The idea is pretty much the same like if you would try to manually tweak a volume controller in a response to the changing volume levels of your audio by trying to keep the overall volume level of the audio within a defined minimum and maximum range. With compressor, this all happens automatically: you can make the quieter parts in your mix louder and also make sure that the louder parts won’t cause clipping as the compressor reduces the gain of the peaks and you can set the threshold level where this is happening and how.
In a mastering situation, compression can be used to make your mix sound dynamically balanced.
Here’s the most common compressor controllers explained:
Couple of tips using single band compressor in a mastering situation: you might wan’t to try to use low ratio, long attack and release times for more transparent sounding results (transparent in this context means avoiding that squashed and pumpy sound… keeping the audio as original/natural sounding as possible).
However, every mix is different so it’s IMPOSSIBLE to give any exact settings, but you can START experimenting with these:
If your mix starts to sound too squashed, try decreasing the Ratio. Experiment with different Threshold/Ratio combinations.
As a rule of thumb, use the compressor sparingly in a mastering situation to avoid squashing.

Multiband compressor is a great tool in mastering fx chain for fine tuning the volume levels in different frequency areas.
Let me explain the multiband compressor a bit: normal single band compressor (like Fruity Compressor and Fruity Limiter when the compressor mode is activated) affects to the WHOLE frequency band, but multiband compressor lets you apply the compression to a SPECIFIC frequency bands – in this case, low, mid and high. For each band, you can set the filter cutoff point. That means you can define what frequency areas the band compressors will affect.
Multiband compression is very handy tool in mastering because, if you wan’t to compress (control the volume behavior) of just the low frequency range, you can do that without affecting too much to the the mids and highs and vice versa. For example, if you have loud peaks somewhere in the low frequency area, you can attenuate these without reducing the gain of the mids and/or highs.
Basically, you could do this with an eq as well, but using multiband compressor here will give you a bit more different sounding results than eq – more “organic” or whatever the proper term is.
Here’s a quick introduction to different parameters in Fruity Multiband Compressor. Check the pic below (click to see it bigger):

What settings do I recommend to use with Fruity Multiband Compressor? Again, it’s impossible to give any recommendations as everything depends what kind of audio you are mastering. You can START with these though, but be cautious: these may NOT work at all with your mix (I actually feel a kind of dumb by recommending specific settings here…)!
Seriously, you need to learn to use your ears and let them judge what settings to use. ?
Now, to the boosting eq.
This is the eq unit that comes AFTER the compression. If you wan’t to add a bit of brightness to the whole mix, try boosting frequencies around 8-15 kHz using peaking filter with a semi-broad bandwidth.
The boosting could’ve been done with multiband compressor gain controls as well, but the eq is here for even more precise control over the frequencies. Like I mentioned in the multiband compression section above, it will give a slight different results than eq when dealing with the frequency adjustements.

Limiter is what you use for maximizing the volume of the whole mix without distortion and Fruity Limiter is pretty good for that. The purpose of a limiter in a mastering situation is to limit the output level to a defined maximum level (usually near to 0.0dB) to avoid clipping when you’re increasing the gain.
I’ll try to explain a bit how the limiter works:
Limiter is a close relative to compressor. It keeps the signal from going above a threshold value, just like compressor. If the peaks are trying to go above the threshold value, a gain reduction will occur.
However, in compressor, the gain reduction is applied in a more gentle way and it also affects to the quieter parts of the signal by making them louder, whereas limiter (at least brick-wall limiter) squashes the peaks that are trying to go above the threshold value and leave the quieter peaks alone. Limiters gain reduction is absolut and more aprubt than compressors. That’s the main difference.
In a limiter, you set the level above which the signal will be limited by using the output Ceiling. Usually it’s set to -0.3dB. Now when you start to increase the volume by using input Gain, the limiter will squash all the signal peaks that are trying to go above the -0.3dB. So the more you are trying to maximize the volume of your mix, the more squashed it will sound. Try to be gentle here by not destroying your mix ?
Some limiters like Fruity Limiter has the attack and release controls as well. Attack controls how quickly the limiter responds to the signal peaks. The Release controls how quickly the signal will “recover” from the limiting.
Here’s some of the most important Fruity Limiter settings introduced:

You can start with these settings, but remember that everything depends on the audio material you’re mastering:
Experiment with the input gain, but be gentle with it to avoid squashing your mix. You know you’re putting too much gain when the song is starting to sound like stressed or like it’s in great pressure. Try to find a balance between maximum possible loudness and not letting your mix to sound overly squashed.
Export the song once again to WAV using highest quality settings, except set the WAV bit depth to 16 bit as this is standard in mastering because you can’t burn 24 bit files to CD.

That’s it. Hopefully this tutorial gave you an idea what kind of tools you can use (and how to use them) to master a song in FL Studio.
However, I can’t stress enough that EVERYTHING starts from a good mix so it’s essential first to make things sound right and polished already in the mixing stage and not trying to use mastering to fix a clear mixing issues.
Also, mastering is not something you learn overnight. Personally, I’m always kind of struggling with it as well. It takes a lot of patience and trial and error, but experimenting is the best way to learn.
Remember also this: using compression in mastering isn’t necessity. If your song sounds good without compression, then don’t use it. It’s not something that is required for making a mix sound great. It’s just there to fix the dynamic range. Actually, EVERYTHING – be it eq, compressor or limiter – depends on the mix and what kind of sound you’re after for. Ask yourself: what do I want – and start from there.
Here’s how you load it to a mixer track.

Final tip: when you test this mixer state file of mine and you’re experiencing an overly squashed sound, firstly decrease the amount of input Gain in the Fruity Limiter as I’ve set it to pretty high.
For more about mastering, I suggest reading some of these articles:
If you’re really serious about mastering your song to a professional level, using a mastering engineer is recommended. Check out some of these guys:
Ok. That’s about it. ?
Credits to Mo Volans tutorial, which I used as a reference to create this tutorial!
I hope this tutorial helped you to start mastering a song in FL Studio.
HowToMakeElectronicMusic.com (HTMEM) - A music production website with plenty FL Studio tutorials, interviews, news, free music production tips, and free downloads.
THANK YOU. ?
I can’t believe how in depth you made this. ahhhh I can’t wait to download your mixer file and and try tweaking a few things! You should write a book on producing 🙂 I mean that’s basically what your website is ? Anyways I will have to try this out now but I’ll post back and let you know how it works for me!! Thanks again!!
Hey Petri, I must say just amazing tutorials, I have been using flstudio from early days but your tutorials have just made me master some stuff. though I have a question, what is your opinion about mastering through analogue devices and recording it back to computer as wave file, as most producers, suggest it has that warmth…I would be very interested to hear your views on it. much thanks in advance…:)
Thank you, Bala! I gotta say making these tutorials benefit myself too: I’m learning new little details almost every time I create tutorial 🙂 Now to your question: unfortenately I have only little experience on dealing with analogue devices. I’ve heard also that they add the kind of warmth that software isn’t capable of. I once “test mastered” one of my songs using Tom Waltz mastering service and I have to admit it sounded really good. He’s using analog and digital equipment. So with that said, if you got the $ to put it, it might be a good idea 🙂